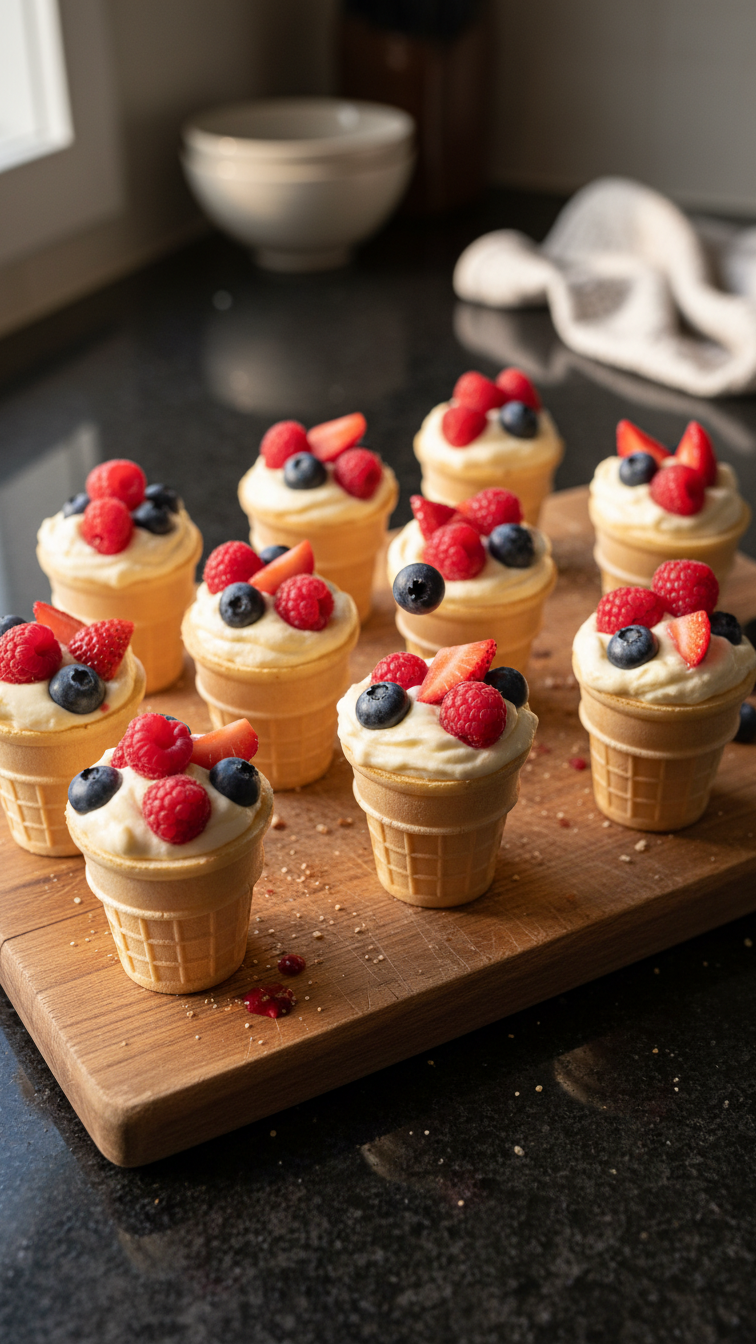
Cheesecake Surprise Mini Cones
Highlighted under: Treats & Confections
I love experimenting with fun and creative desserts, and these Cheesecake Surprise Mini Cones are a delightful treat that never fails to impress! Each cone is filled with a rich, creamy cheesecake filling and topped with a surprise center that elevates the flavor profile. Perfect for parties or a sweet indulgence at home, these mini cones are both visually appealing and incredibly delicious, making them an instant favorite among friends and family. I can’t wait for you to try them out and see how easy they are to make!
Creating these Cheesecake Surprise Mini Cones was an exciting challenge for me, particularly when it came to finding the perfect balance of flavors and textures. I knew I wanted something that was both creamy and crunchy, which is why I chose a graham cracker base for the cones and a rich cheesecake filling. After multiple tastings, I added a hidden fruit or chocolate surprise in the center to make each bite an unexpected delight!
One key tip I discovered is to let the cheesecake mixture chill in the fridge for at least 30 minutes before filling the cones. This ensures that the filling becomes firm enough to hold its shape when you scoop it in, which makes for a cleaner presentation. Trust me, your guests will rave about this delightful little dessert!
Why You'll Love This Recipe
- Creamy cheesecake filling with a hidden surprise in every cone
- Delightfully crunchy graham cracker cone base
- Perfectly portioned for gatherings or a sweet personal treat
Mastering the Cone Base
The graham cracker cone base is crucial for providing a contrasting texture to the creamy cheesecake filling. It should be baked until lightly golden, which will take about 10 minutes at 350°F (175°C). This baking step ensures that the cones hold their shape and provide a delightful crunch. Just be careful not to overbake them, as they can become too hard and difficult to bite through. If you can't find mini cone molds, you can create your own by shaping aluminum foil into the desired cone shape.
Using unsalted butter is recommended to effectively control the saltiness of your dessert. When combining the melted butter, graham cracker crumbs, and sugar, make sure the mixture resembles wet sand. This ensures good adherence when pressed into molds. If you want to experiment with flavors, consider adding a pinch of cinnamon or nutmeg to the crust for added depth. Allowing the cones to cool completely is vital because warm cones can compromise the cheesecake's integrity.
Store any extra cone mixture in an airtight container for future use. If you find yourself short on time, you can also purchase pre-made cupcake or ice cream cones to use as a base, although the homemade version offers a superior flavor and texture.
The Cheesecake Filling Technique
For a silky-smooth cheesecake filling, ensure that your cream cheese is at room temperature before mixing. Cold cream cheese can lead to a lumpy filling, so let it sit out for about 30 minutes before starting the recipe. Whipping air into the cream cheese while gradually adding powdered sugar helps create a light, fluffy texture. Remember to scrape down the sides of the bowl frequently to ensure even mixing.
When whipping the heavy cream, stop once soft peaks form; overwhipping can result in a grainy texture that may not blend well with your cheesecake mixture. Gently fold the whipped cream into the cream cheese mixture using a spatula, which helps maintain the lightness of the filling. If you desire a sturdier filling, you can consider adding a tablespoon of cornstarch to the mixture, which can create a firmer texture in the finished cones.
The flavor profile of the filling can be customized easily. You can add lemon zest for a citrusy twist or a splash of almond extract for depth. Each of these additions brings a new level of flavor to your cones and can be adjusted according to your taste preferences.
Serving and Storage Tips
These Cheesecake Surprise Mini Cones can be made up to 24 hours in advance, making them perfect for planning ahead for gatherings. Just keep them tightly covered in the refrigerator to maintain the freshness of the cheesecake filling. When serving, consider garnishing the tops with fresh fruit or a drizzle of the same fruit preserves or chocolate syrup for an inviting presentation.
If you want to scale the recipe for larger gatherings, simply double or triple the ingredients, especially for the filling. Just make sure to keep the cone molds in mind; you may need to bake in batches if you’re using a standard oven. For those who prefer to limit sugar or dairy, consider alternatives such as dairy-free cream cheese and low-sugar fruit spreads to cater to various dietary preferences.
For a unique twist, experiment with different types of cone bases, such as chocolate wafer crumbs or even crushed cookies. This can add another layer of flavor to your dessert and give your guests something extra special to enjoy. Whether you stick to the classic graham cracker or try something new, these mini cones are a fun addition to any dessert table.
Ingredients for Cheesecake Surprise Mini Cones
Cheesecake Filling
- 8 oz cream cheese, softened
- 1/2 cup powdered sugar
- 1 tsp vanilla extract
- 1/2 cup heavy cream
- Your choice of fruit preserves or chocolate syrup for the surprise center
Cone Base
- 1 cup graham cracker crumbs
- 1/4 cup unsalted butter, melted
- 2 tbsp sugar
Make sure to prepare the filling ahead of time to allow it to chill properly!
Instructions
Prepare the Cone Base
Preheat your oven to 350°F (175°C). In a mixing bowl, combine graham cracker crumbs, melted butter, and sugar. Mix well until fully combined. Press the mixture into mini cone molds and bake for 10 minutes. Allow to cool completely.
Make the Cheesecake Filling
In a large bowl, beat the softened cream cheese until smooth. Gradually add powdered sugar and vanilla extract, mixing until combined. In a separate bowl, whip the heavy cream until soft peaks form, then gently fold it into the cream cheese mixture until fully incorporated.
Fill the Cones
Once the cones have cooled, fill each cone with the cheesecake filling. Use a piping bag for better control if desired. Before sealing the top, drop a spoonful of fruit preserves or chocolate syrup into the center of each cone for the surprise!
Chill
Refrigerate the filled cones for at least 30 minutes to allow the filling to firm up.
Serve chilled and enjoy your delightful mini cones!
Pro Tips
- Experiment with different flavors of fruit preserves or fillings to customize your mini cones to your taste.
Ingredient Substitutions
If you’re out of heavy cream, you can substitute it with milk mixed with a bit of cornstarch to help thicken your filling. Aim for about 3/4 cup of milk mixed with 1 tablespoon of cornstarch, cooked slightly to dissolve the cornstarch before letting it cool. Additionally, for those avoiding gluten, there are gluten-free graham cracker options available that will work perfectly in this recipe without compromising flavor.
For the surprise center, feel free to mix it up! Instead of fruit preserves, you could use peanut butter or even a dollop of Nutella for chocolate lovers. If you want a citrusy burst, lemon curd makes an excellent surprise that complements the richness of the cheesecake beautifully.
Vegetarian-friendly gelatins such as agar-agar can effectively replace traditional gelatin if you're looking for a plant-based option while maintaining the delightful surprise center. Be sure to adjust the setting process as needed with each substitution.
Troubleshooting Common Issues
If your cheesecake filling turns out too runny, it may be due to overwhipped cream or insufficiently thickened components. To remedy this, gently fold in an additional tablespoon of whipped cream or a tablespoon of cornstarch mixed with a bit of cold water to help firm up the consistency. Allowing it to chill in the refrigerator longer can also help set the filling before serving.
If the cones feel too crumbly when baked, consider adding an extra tablespoon of melted butter to your graham cracker mixture. The right moisture ensures that they hold together without collapsing when filled. Conversely, if they seem too hard, reduce the baking time slightly next time to avoid over-baking.
Finally, if you're struggling to pipe the filling into the cones neatly, try using a wider piping tip for better flow. Alternatively, a resealable plastic bag with a corner snipped off can serve in a pinch. This method often allows for better control, minimizing any mess when filling the cones.
Creative Presentation Ideas
Presentation can elevate these mini cones from delightful to extraordinary. Consider using small dessert stands or tiered trays to create height and visual interest at your gatherings. A sprinkle of colored sugar or edible glitter can add sparkle and entice guests to try them. You might also want to pair different flavors and colors of fruit preserves to showcase variety.
For a fun and interactive experience, consider setting up a toppings station. Offer small bowls of various toppings, such as crushed nuts, sprinkles, or even mini chocolate chips, allowing guests to customize their cones as they wish. This not only enhances the experience but encourages creativity and adds to the fun of enjoying these mini desserts.
Lastly, if you’re feeling artistic, consider drizzling melted chocolate over the cones right before serving. This adds a finishing touch that not only looks phenomenal but also enhances the flavor. Just ensure the cones chill long enough so that the chocolate sets properly.
Questions About Recipes
→ Can I use store-bought cones?
Yes, store-bought mini cones work great if you're short on time!
→ How do I store leftovers?
Keep them in an airtight container in the refrigerator for up to 2 days.
→ Can I make these ahead of time?
Absolutely! You can prepare the cones and filling a day in advance.
→ What can I substitute for cream cheese?
You can try using mascarpone cheese for a different flavor, although it may alter the texture slightly.
Cheesecake Surprise Mini Cones
Created by: The Dailydishrecipes Team
Recipe Type: Treats & Confections
Skill Level: Easy
Final Quantity: 12 cones
What You'll Need
Cheesecake Filling
- 8 oz cream cheese, softened
- 1/2 cup powdered sugar
- 1 tsp vanilla extract
- 1/2 cup heavy cream
- Your choice of fruit preserves or chocolate syrup for the surprise center
Cone Base
- 1 cup graham cracker crumbs
- 1/4 cup unsalted butter, melted
- 2 tbsp sugar
How-To Steps
Preheat your oven to 350°F (175°C). In a mixing bowl, combine graham cracker crumbs, melted butter, and sugar. Mix well until fully combined. Press the mixture into mini cone molds and bake for 10 minutes. Allow to cool completely.
In a large bowl, beat the softened cream cheese until smooth. Gradually add powdered sugar and vanilla extract, mixing until combined. In a separate bowl, whip the heavy cream until soft peaks form, then gently fold it into the cream cheese mixture until fully incorporated.
Once the cones have cooled, fill each cone with the cheesecake filling. Use a piping bag for better control if desired. Before sealing the top, drop a spoonful of fruit preserves or chocolate syrup into the center of each cone for the surprise!
Refrigerate the filled cones for at least 30 minutes to allow the filling to firm up.
Extra Tips
- Experiment with different flavors of fruit preserves or fillings to customize your mini cones to your taste.
Nutritional Breakdown (Per Serving)
- Calories: 160 kcal
- Total Fat: 10g
- Saturated Fat: 6g
- Cholesterol: 40mg
- Sodium: 80mg
- Total Carbohydrates: 16g
- Dietary Fiber: 1g
- Sugars: 8g
- Protein: 2g